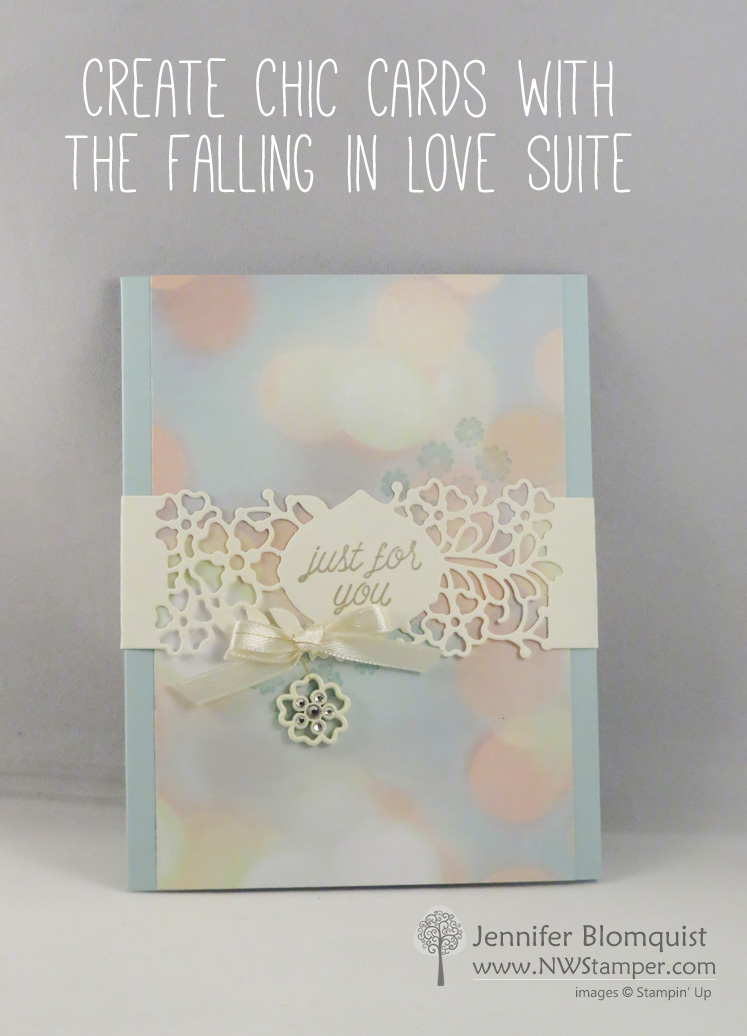
Do you remember the Bokeh technique? The big trend for making your cards look like they had the out of focus light spots? Well, I shared how to make your own in this blog post, but sometimes I want to go the quick route and just use pretty paper like this Falling in Love designer paper! It has a bunch of cute patterns including multiple bokeh photo-realistic designs! (You can see all the prints in my Occasions Catalog walkthrough video starting at 26 mins HERE)
This was a card that I got to make at Onstage Local in Vancouver recently. It was a fun way to play with many of the new toys in the Falling in Love suite. Like the delicate So Detailed Thinlits! That is what I used to make the belly band for the card. It is one die cut to make the front of the band –and YES! that rounded diamond shape is part of the die cut, so no extra punching required – then you just have to adhere that to a strip of paper you cut to complete the band. The nice thing about this is that you have wiggle room to make the band as wide or as narrow as you need. Isn’t it just so pretty?
Tips for making this card:
- Keep it simple – pick one or two elements to be your focal point and then keep everything else subtle to let those pieces shine! In this case, the focal points are the pretty Sending Love Embellishments and the So Detailed belly band! To let them stand out, the stamping and the colors in the card are kept simple and muted.
- Try stamping on your patterned paper! In this case, if you look closely at the picture, you will notice some of the flowers from the So In Love stamp set stamped directly onto the patterned paper in Soft Sky ink. They are really subtle, but because of their shape, they help tie things in to that flower embellishment that I said was one of my focal pieces. Often when we use patterned paper, we think we are done, but try adding some accents to it and it can be a great touch!
- Put a bow on it – Sometimes you want a bow without all the extra wrappings of ribbon. Tie your bow and then add it to your project by pressing a glue dot to the back of the knot in the ribbon and then placing the bow exactly where you want on your card. For added fun, tie some twine through the embellishment and then tie the twine around the bow for a dangling look that actually can move!
So, what do you think? Ready to give simple and beautiful a try?
Don’t forget! Order your product samplers this week before they are gone!
Just a note that I’ll be accepting Product Sampler orders through the end of this week. So if you wanted to get your pieces to try out and play with, don’t wait to let me know! Plus you’ll be able to get samples of the Sale-a-Bration ribbons and papers without needing to place that $150 order to get all three!
See what is included and get yours HERE
![NWstamper signature_thumb[9] NWstamper signature_thumb[9]](https://i0.wp.com/www.nwstamper.com/wp-content/uploads/ad87b4046c1e_C9F6/NWstamper-signature_thumb9_thumb.png?resize=322%2C118)
January News, Notes, and Specials!
- January Hostess Code is 9PKRDX7F – Use this code when you shop online with me and earn extra perks!
- Sale-a-Bration is here! Get even more between January 4-March 31st.
- For every $50 ordered, pick any item from the Sale-a-Bration catalog to get for FREE added to your order
- Place a $250 order or party and get an extra $25 to spend for FREE!
- BEST DEAL – if your wish list is over $100, consider getting the demonstrator starter kit and joining my Fun n’ Crafty Stampers. You get to pick out $125 in product for $99, get 20% off all your future orders, get 2 stamp sets of any value to add FREE to your kit during Sale-a-Bration, and join the amazing community of my team and demonstrators worldwide online. Get started here
- Try it all with the Occasions Catalog Product Samplers – Only available for a limited time! See what is included and get your set here,
- January’s Premium Tutorial Pack is out! Get your copy of 12 amazing tutorials including 3D projects, clean and simple, and fancy fold cards!
- FREE with a $50+ purchase from me in January using the hostess code 9PKRDX7F
- Purchase the PDF directly for only $14.95 for all 12 step by step tutorials. Get it or prior month’s packs here.


