As I head into the week of the spring OnStage event (the Stampin’ Up! convention weekend), I have treats and gifts on my mind. I’ll be headed to Shreveport, LA with 5 of my Fun n’ Crafty Stampers group to get a sneak peek at the upcoming Annual Catalog that launches in June as well as get inspired by the great creativity and savvy of other demonstrators. I’ve never been to Louisiana before! I am excited to get a chance to adventure somewhere new and bond with my team at the same time! So, be watching my Northwest Stamper Facebook page for real-time updates from my trip. I’ll also try to post here after the main event.
So, one of the things I’m working on today is gifts for my team attending with me, which made me think this would be the perfect day to share this easy favor box idea using the clear tiny treat boxes.
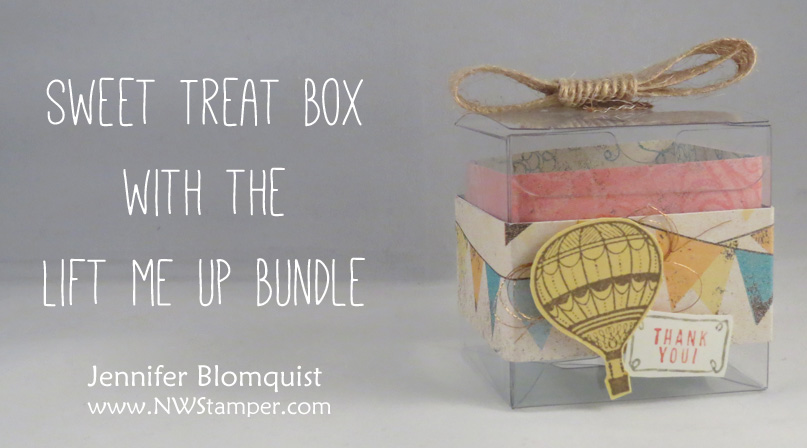
I have been given these little favor boxes at an event in the past and they had just been sitting in my drawer. I wanted to make a 3D project using the Lift Me Up bundle – the stamps and dies featuring the Hot Air Balloons and realized that the clear boxes would be perfect! They are the perfect way to show off the pretty designer paper as well as getting to show off your tasty treats you are gifting someone as well. These boxes are AWESOME for filling with colorful little treats like jelly beans or m&ms.
Two Layer “Belly Bands” give a cool look for your favor box
So I started by wrapping a piece of the Cupcakes & Carousels designer paper around the OUTSIDE of the box. Now, the boxes are 2″x2″x2″, so you will need two strips of paper. I recommend figuring out which is the “Front” of your box and placing the center of your patterned paper strip on that front panel and then wrapping around to the back. Then you can place your second paper strip on the “back” to cover the ends of the first piece of paper.
Tip: You will want to use Fast Fuse or Tear & Tape as your adhesive for holding the paper to the box. I like using the Tear & Tape since you can easily lay out long strips on your patterned paper in exactly the right position before removing the backing of the tape and adhering down.
Then I added a second strip of complementary patterned paper from the same Cupcakes & Carousel’s paper pack to the INSIDE of the box. I love how you get the cool visual effect of having the clear plastic spacing between them.
TIP: Only put adhesive along the bottom edge of the inside pattern paper. That way you don’t see the adhesive line on the outside of the box. Your bottom edge will be hidden behind the outside band of patterned paper.
Once you have the paper bands in place, then you get to have fun decorating the outside. I stamped the small balloon in Soft Suede ink onto a piece of So Saffron cardstock and die cut it out. Then I layered some gold metallic thread in a loop behind the balloon before adhering to the box front with a Stampin’ Dimensional. I also added the little Thank You note (stamp and die cut are from the Lift Me Up bundle) and taped it directly to the box front. Add a burlap bow to the to top and you have a sweet box that is super functional and cute to boot!


![NWstamper signature_thumb[9] NWstamper signature_thumb[9]](https://i0.wp.com/www.nwstamper.com/wp-content/uploads/ad87b4046c1e_C9F6/NWstamper-signature_thumb9_thumb.png?resize=322%2C118)